SIRS Information for Instructors
SIRS – Changing Dates & Adding Questions
Faculty and instructors can change the survey dates to better fit the individual class schedule. Some restrictions apply to prevent conflicts with grading and survey report distribution. If you need to extend the survey beyond the current limits, contact OTEAR for assistance.
Please note that the Blue survey system schedules faculty email messages separately from the student email messages. If you change your survey dates, it will only affect the student schedule while faculty emails will remain on the original schedule, out of sync with the new survey dates. Please log in to Blue to view the current survey details instead of relying on the email messages.
Written instructions are below or this video details adding questions, changing dates, and viewing response rates.
Important – Don’t Confuse Dates!
When looking at the survey details in Blue, make sure you look for dates that are specifically survey dates as illustrated below, or specifically labeled “evaluation ends on”. Other dates will refer to your own access to modify the survey details (e.g., the last day to add questions or the last day when you can alter the dates). These are not always clearly labeled, so please take care that you have the correct dates to give to your students.
Instructions for Changing Dates
- Log into the Blue survey system at https://sirs.rutgers.edu/blue (link will open in a new tab or window). If prompted, choose “Instructor” or “Administrator”.
- Click the “Subject Management” link in the left-hand margin, or go directly to the survey management page.
Alternatively, you can use the links in the “Tasks” section, however, we recommend using the “Subject Management” page for easier access. - You will see a tile for each course, with a search box near the top. Courses should appear approximately two weeks before your survey is set to run. The tile summarizes the survey settings, and changes to show response rate once the survey starts.
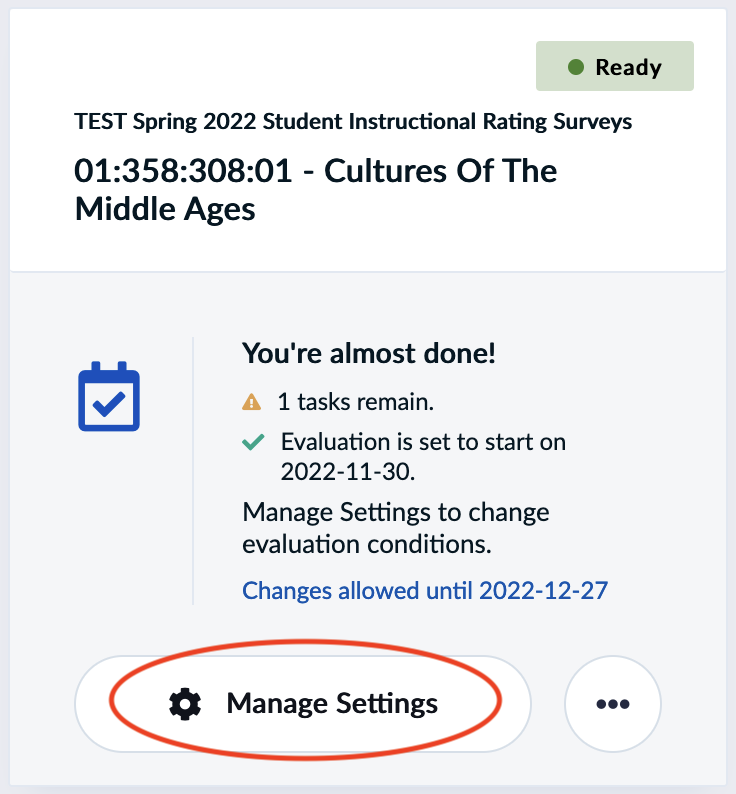
Before the survey runs
Click “Manage Settings” or![]() to add questions, change the survey dates, or copy the survey link.
to add questions, change the survey dates, or copy the survey link.
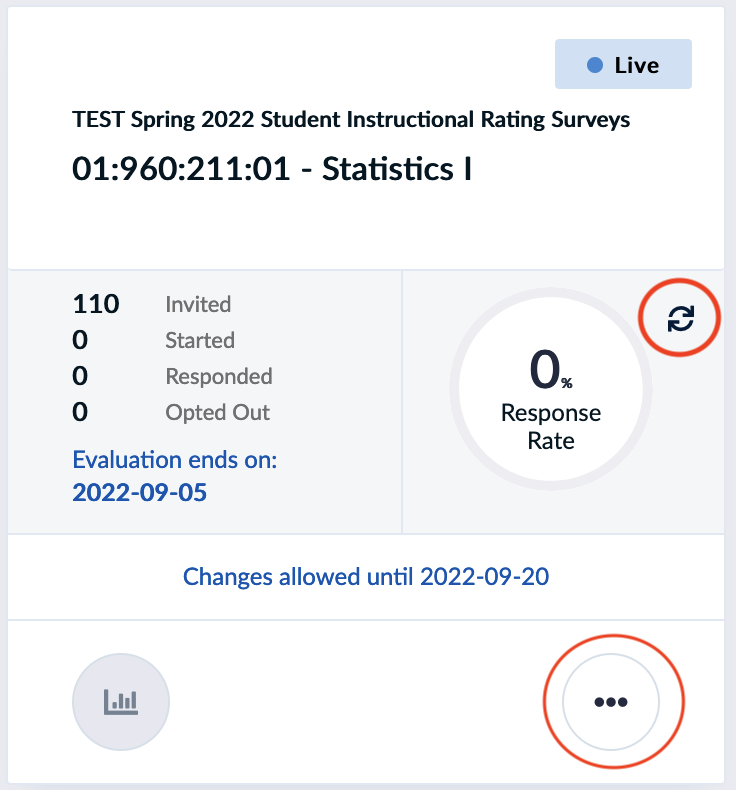
During the survey
Click![]() to change the survey dates or copy the survey link.
to change the survey dates or copy the survey link.
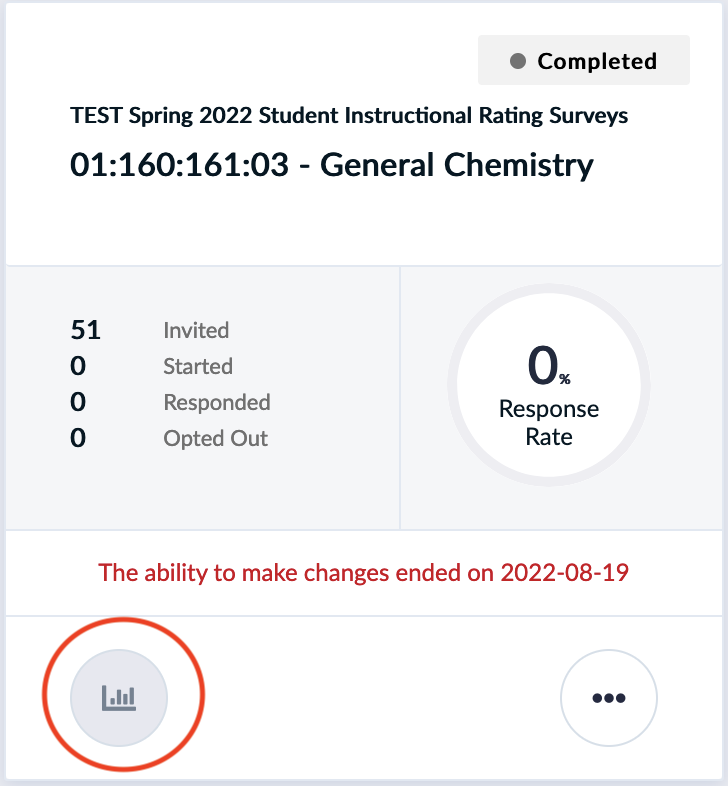
Results – after the semester ends
Click![]() to view the survey results.
to view the survey results.
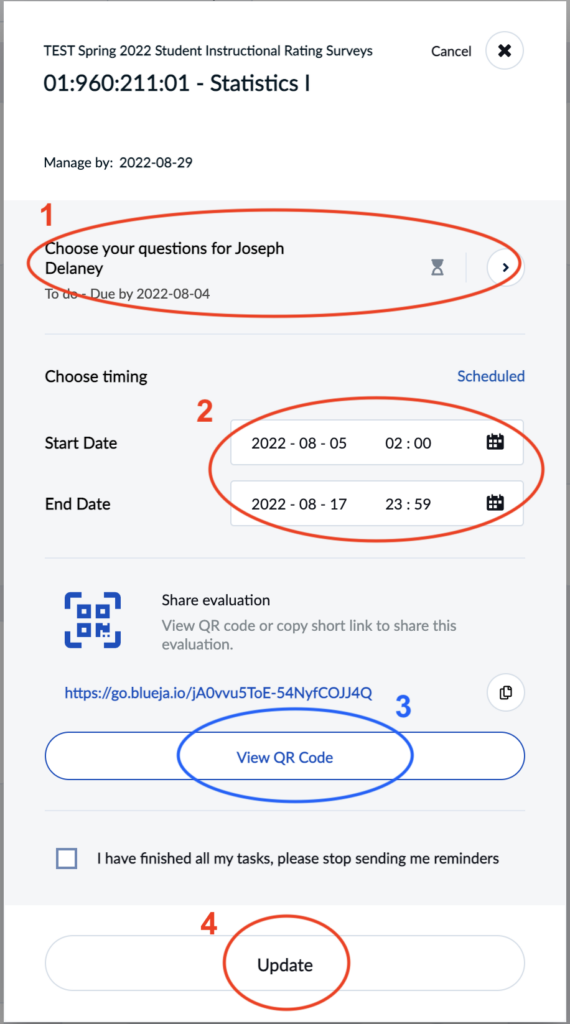
- After clicking “Manage Settings”, you have:
- a link to add questions, and preview the current survey
- a section to change dates
- a QR code and link to give students to go directly to this survey for this section (for multi-section courses, it is preferable to use the main QR code and survey link)
- An update button to save your changes
- To change dates, simply edit the dates and click the “Update” button. If you use the calendar pop-up to choose the date, please be sure to click both “Apply” and “Update“
- Note that date changes affect all instructors teaching the same section of that course.
- To add questions, follow the instructions below.
Important notes:
- Questions must be added prior to the survey start date. If you change the start date, contact OTEAR to extend your question-adding deadline.
- Existing questions are standardized and cannot be removed or changed.
- Some schools or departments may have added questions to the standard SIRS. Use the “Preview” button to see your current survey, or refer to the full list of SIRS questions.
- You are limited to adding 12 additional items (note that the “matrix” items can list multiple questions in a single item).
- For courses with more than one instructor, student responses to questions added by an instructor will only be reported back to that instructor. If an administrator adds a question it is considered “section-wide” and responses are reported to all instructors in that course section.
Instructions for Adding Questions
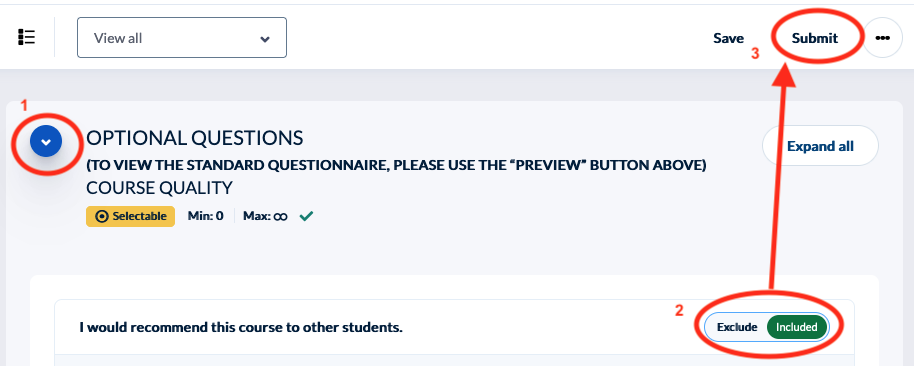
- Click the “Choose your questions…” link in the survey settings box, as illustrated above. After your survey begins, this will change to a “preview your questions…” link. This will open a new page with options for adding questions or previewing your survey.
- The “Preview” button at the top of the page will show you the current survey and existing questions as they will appear to students (if your screen is not wide enough, the preview may be hidden under the “…” ellipses button). Note, however, that if multiple instructors teach the same section of the course, you will only see your own section of the survey, while students will see a section of questions for each instructor.
- Several pre-existing questions are listed by category.
- Click the blue triangles (1) to see the questions in each category.
- To use any of the pre-existing questions, click “Include” to the right of that question. Only “Included” questions will be added to your survey.
- Remember to click “Submit” when finished. You can save and come back later to finish, but questions will not appear for students until you click “Submit”.

- To add questions of your own, use the “Custom-Worded Questions” section near the bottom.
- Click “Customize” to enter the text of your questions.
- After entering your question text, click the upper “X” to save the question.
- Some questions have pre-set scales, others use a plain numeric scale. Always include the scale definition in the text of your question when using the plain numeric scales (for example, “where 1=poor and 5=excellent”)
- It is not possible to re-order the questions or change the scales. You may need to adjust the wording of your questions to fit the available positions and question types, for instance, rephrasing a question as a statement on a disagree/agreement scale.
- The “Matrix” questions allow you to add several items at once, provided they all use the same scale.
- Click “Submit” to complete the process and add the questions to your survey. (clicking “Save” will save the choices you made for later editing, but will not add the questions to the survey – you must click “Submit” even if you saved previously).
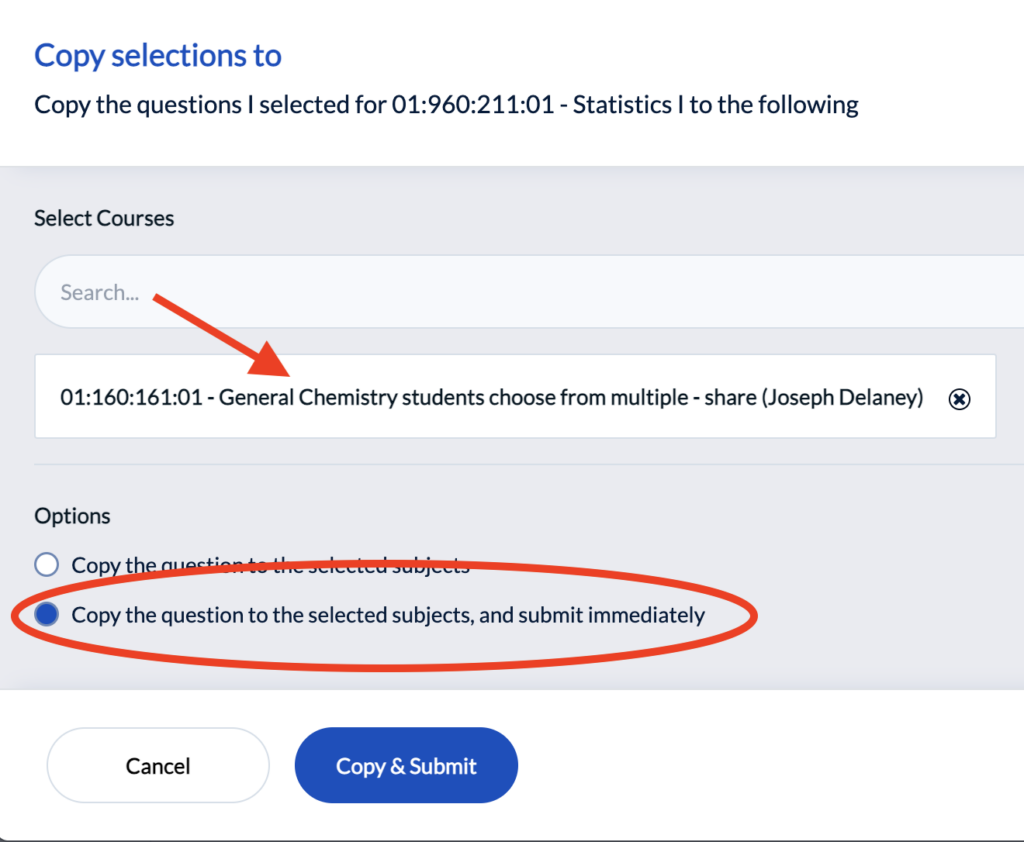
- If you want to add the same set of questions to surveys for other sections or courses, use the copy button
 (next to the “Submit” button near the top of the page).
- Use the “Copy to…” option to copy the current set of questions to other course surveys. You may also copy questions from another, previously-edited course to the current one by using the “Copy from…” option.
- Click on the search box to see a list of your current courses and choose which will use the same set of questions. Click the ”Select” links to add them to the current list.
- Click the option to “Copy the questions…and submit immediately” – unsubmitted questions will not appear on the final survey!
- Click the “Copy and Submit” button.

